So I am trying out a new GoPro MAX for mapping - thank you Camera Grant Program 2.0!
Initially I was not too happy with the resolution of the capture. The overall 360 capture is great, but the resolution to, for example, read road signs or house numbers is pretty potato quality.
-
Read below to see what I found so far that dramatically improves image quality
-
I am interested in any advice or suggestions anyone may have to improve it further
-
This is specifically for GoPro MAX bicycle recommendations (Video TimeLapse at 0.5 sec) but I believe similar ideas could improve e.g. video captures from motor vehicles (might be best as TimeWarp at 2X/12 FPS or 5X/6FPS, which would allow using the techniques below while keeping file size smaller), and possibly also walking (photo timelapse).
You can see the problem I was having, and how much improvement I have been able to make so far, in the snips below.
[[NOTE: You’ll need to view the images below at full resolution to see what I’m talking about - you might need to download them, depending on the device you’re viewing this on. To make the difference more clear, I’ve put a smaller comparison photo first.]]
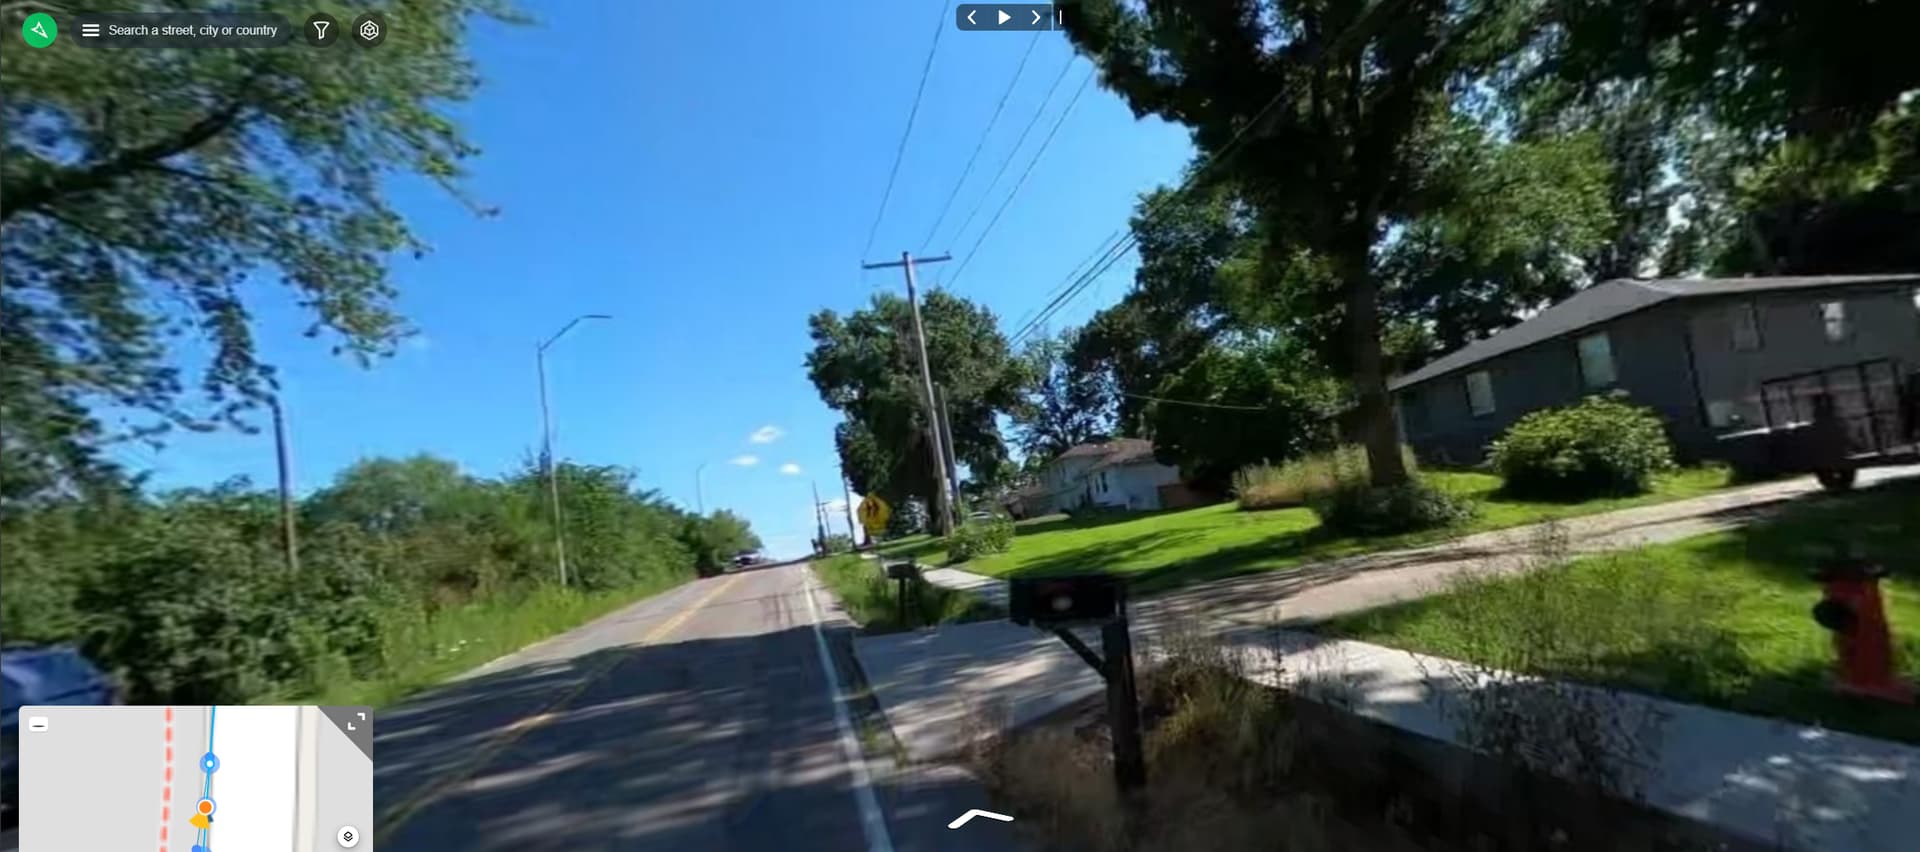
#1. Is GoPro MAX with Mapillary recommended settings (as found online here) and most everything else default (out of the box). Time Lapse Video, 0.5 second interval (taken by bicycle), uploaded via the desktop uploader.
Note that you can’t read the number on the mailbox, MANY compression artifacts in e.g. trees & signs, and generally just low resolution and beyond that, smudgy.
MAX defaults (Video Time Lapse, 0.5 seconds, taken while bicycling):
Download full resolution photo #1
#2. Is my cellphone capture, just for comparison. Obviously, not a 360 capture but note that you can easily read the numbers on the mailbox, the school crossing sign shows plenty of detail, etc. I would hope the MAX could at least do close to this in resolution.
My cell phone (4000x3000 resolution) - for comparison:
Download full resolution photo #2
#3. Is the MAX with UPDATED/Improved settings. The most important settings are not available by the usual menus - you need to install the GoPro Labs firmware and then follow the instructions to update some “secret” settings.
IMPROVED MAX quality (Video Time Lapse/0.5 seconds with GoPro Labs settings as described above, taken while bicycling):
Download full resolution photo #3
Note that the Improved version is quite a bit lighter - perhaps even overexposed somewhat - and less saturated. I think with some further tweaking it could be less overexposed and more saturated, while still maintaining the detail - more on those settings, and my next planned experiments below.
>>> Again note that you need to view the photos above at full resolution to see the difference. At low resolution they all look about the same, of course.
GOPRO MAX SETTINGS FOR IMPROVED QUALITY
So far I am finding that the BITRATE setting is the most important (BITR command - as explained here). I set the bitrate from default around 100 to 200 (!MBITR=200) and what do you know - compression artifacts gone.
Of course this makes files a LOT larger, but still the card I have will hold 10+ hours of Video Timelapse at 0.5 second interval. That is generally more than enough for my purposes.
This is a direct link to the page the generates the settings I am currently using. (It is an interesting system - you choose your settings using either a web page or phone app. This generates a QR code, which you scan with the camera. If you have the GoPro Labs firmware installed it recognizes the QR code and implements the settings - giving 3 beeps when successful. It works - only problem I had was getting the camera to recognize a QR code on my phone under the noonday sun. It was just too dim.)
Settings I have experimented with so far:
- BITR=200 - bitrate in the video file. Default is around 100 and I raised it to 200. You might be able to use an intermediate value like 150 and still get better results than the default. Also, you will need a good quality SD card as this writes a lot more bits to disk while recording - older/weaker/low quality cards might not be able to keep up.
You can set this in the QR app (under extras - choose BITR, enter the value, and be sure the “permanent” is checked). If you use the web page to generate the QR code, then you need to enter the special code under “Additional Commands”. It looks like: !MBITR=200 (!M means this setting will be permanent, ie, persist when the device is turned off/on.)
-
Protune Color: Natural or Flat - supposedly “Vibrant/GoPro” color obscures detail. The photo below is “flat” but next I am going to try “natural” as “flat” seems quite washed out.
-
Color Depth = 10-bit - I haven’t experimented much with this, but more seems better for detail (at the expense of larger files) - also, not sure if this even works on the MAX.
-
Bit Rate: HIGH - Again not exactly sure what this does, or how it interacts with BITR=200 set above. Set to HIGH on the theory that HIGH is better. (Again, not 100% sure this setting even does anything on the MAX - the GoPro Labs documentation for MAX is a bit lacking, so there is some guesswork.)
-
ISO Min: 100, Max: 200 - supposedly this is good enough for work sunrise-sunset and even 30 mins before/after (per a user somewhere on the forums). Allowing higher ISO results in much greater noise in the image. The trade-off is lower ISO equals slower shutter speed, which could result in blurring. But per that user, setting max to 200 gives the best results sunrise-sunset +/- 30 minutes.
-
EV Compensation: +0.0 or +0.5 According to that same user, EV +0.5 or even +1.0 gives better results for our purposes - the sky may be more washed out but you don’t lose a lot of detail in shadows etc. +0.5 seems pretty light & washed out, so I am going to try 0.0 again. But +0.5 definitely keeps shadows from being too dark! (Increased color depth should help here, too - if it really is 10 bit that gives more headroom in very light & very dark areas of the image.
-
Sharpness: LOW - According to that same user, medium or high sharpness results in loss of detail - makes sense just based on what sharpening even is.
-
GPS: On - included just to be safe/ensure it’s always on.
(Most settings that are changeable via the menus I just leave “not set” - and set them via menus. But if you’re going to use the QR code every time you can include some of the key settings in the QR code. This is a good way to ensure settings don’t get inadvertently changed and you always have the same setup when you’re mapping. You can also set up handy things like auto-starting/stopping filming with your movement (under “Delayed Actions”), auto-set of date/time, and so on. I haven’t experimented with any of that yet.)
- Also I mount the MAX sidewise, as described here. Clarity and resolution for super-wide lenses is best near the center of the view, and deteriorates some especially at the very edges. Signs and such are usually more to the side than the front at closest approach/best view.
Again the URL which has all those settings pre-set for you to try (or adapt as you like) is here:
(https://gopro.github.io/labs/control/set/?cmd=mTp2oMPRES="8,Mapillary-HighBi"mTtcNd1b1i2M1x0sLg1!MBITR=200)
And again: I would love to hear any suggestions or ideas for better quality with the GoPro MAX!


